The Power of “Power Chords”: Part 1
Alan Robinson
How would you like to expand your chord vocabulary without spending hours upon hours looking at chord books and diagrams that look like your fingers are playing Twister? Where you can achieve all of those sophisticated sounds to include 9ths, 11ths, 13ths, and more but not study calculus and trigonometry in order to understand! Okay, those may be exaggerations to an extent but what if you could accomplish these goals by using 2 notes? Well, you can!
The “Power chord” or chords based on Root/Fifth (i.e. E5, A5, G5, etc…) have been best friends with rock guitarist since the beginning of time. The great news is that they can become an even better friend in creating these awesome advanced sounds. With some simple adjustments and application, power chords placed in the proper locations yield a multitude of harmonic possibilities.
As shown in Example 1, the power chord uses only 2 strings. Basically played with 1st and 3rd (or 4th) fingers. The above diagram illustrates a G5 (root is in red).
Example 2 is an illustration of all of the diatonic power chords in the key of G rooted from the 4th string. Note that all are exactly the same with the exception of the 7th chord in the sequence. For now we are going to leave that chord alone but in following lessons it will play a significant role.
Power chords are very basic in their harmonic content, simply the root of the chord and the 5th. It doesn’t identify major or minor qualities. However, when we change our thinking to reflect the root of the power chord as the 3rd of another assumed root we now have a defined harmony. Example 3 shows all power chords diatonic to the key of G major on string groups 3&4....
....and Example 4 identifies all diatonic notes available on the 5th string.
The notes that are located on the 5th will become our “assumed” roots for our new chords. The reason I refer to them as “assumed” roots is because you do not necessarily have to play the root. Keeping in mind that the bassist holds down the foundation with the root, you are free to play smaller voices and together create a complex harmonic background. This is a frequent approach in jazz. These chord voicings are by no means limited to jazz, they are used in almost all styles of music.
In the following examples we are going to create major and minor 7th chords by simply playing power chords. The roots will be located on the 5th string.
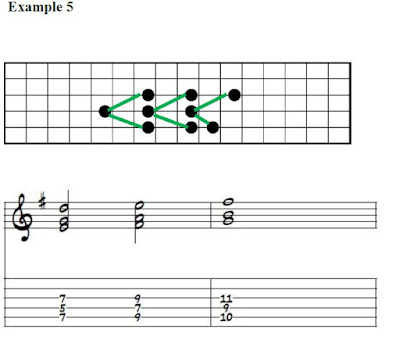
Example 5 uses the power chords G5, A5, and B5 placed as the third for the root notes E, F#, and G. This now creates an E-7, F#-7b5 (b5 is not present), and G Maj7. As previously mentioned, you do not have to play the roots but you can if desired.
Example 6 uses the power chords C5, D5, and E5 placed as the third for the root notes A, B, and C. This now creates an A-7, B-7, and C Maj7. Again, you do not have to play the roots but you can if desired. Something in particular to note with both of these examples is the physical shape the chord creates. As guitarists we tend to rely on shapes and patterns, which is both good and bad. It’s a great benefit as long as you learn how and why they function.
In the case of these examples I identify the shapes as triangles of a sort. The minor seventh chords create an isosceles triangle whereas the major seventh form does not have 2 equal sides.
Remember in the beginning when I said you didn’t have to learn calculus and trig….I never mentioned geometry!
(Insert Dr. Evil laugh here)
One final note that I feel is very important to mention is the pattern of both the power chords in relation to each other and the “assumed” root relations. If you look closely at Example 7 you will notice that the root of the each of the first three power chords are separated by a whole step (2 frets). After the third chord in the sequence there is a half-step and then the next three chords are separated by whole steps identical to the first three.
Also note the pattern of the assumed root on the 5th string (Example 8). You should notice the whole step/half step pattern for both sets and that they are separates by a whole step between the patterns.
Both of the patterns in these examples will be extremely important in future lessons. I recommend trying to commit to memory.
This lesson may have seemed very basic. If so, you will really enjoy the areas we are going to take this series in the upcoming segments. If it didn’t seem basic, that’s fine. You may want to review the lesson and create exercises to help commit to both intellectual memory (brain power) and muscle memory (hand power). As we progress it will only become easier. y we get to lesson three and you see it applied to a tune I think you will really see the benefits.
One way to create an exercise for yourself is to take a list of chords or even better, pick a song you already know, and attempt to apply the concept. We didn’t really talk any deep theory so for now you will have to rely on your ears. If it sounds good it’s a keeper...if not, well you know…
If you would like a free PDF of this lesson visit my website at www.alanrobinson.me. Simply sign up for the mailing list and request The Power of “Power Chords”: Part 1.
Play on...
Alan


No comments:
Post a Comment